Heart-Shaped Raspberry Cheesecake Brownies Recipe
Introduction
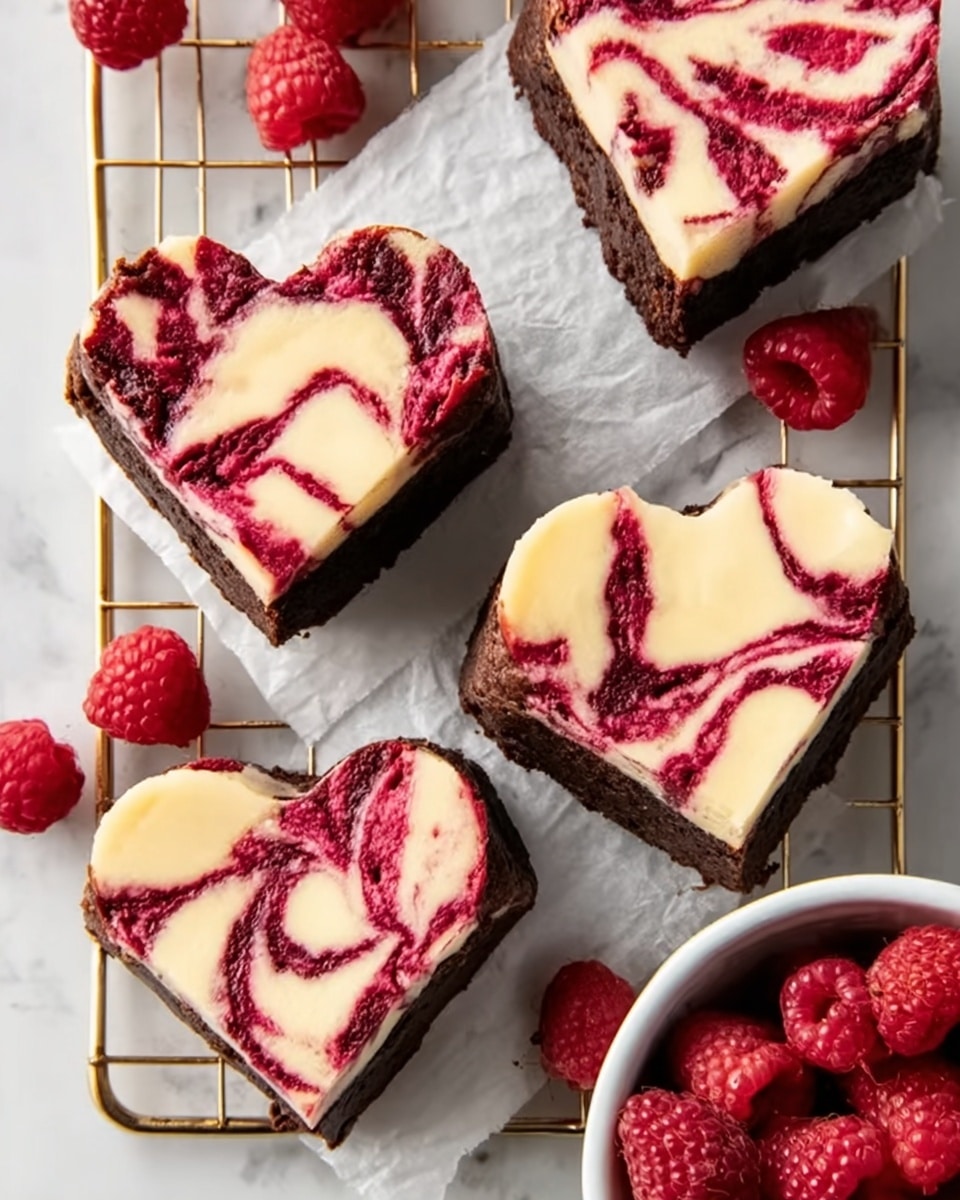
These heart-shaped brownies combine rich chocolate, creamy cheesecake, and vibrant raspberry sauce for a delightful treat. Perfect for Valentine’s Day or any special occasion, they offer a beautiful swirl of flavors in every bite.
Ingredients
- 1 cup raspberries (fresh or thawed frozen)
- 1 tablespoon granulated sugar
- 1 teaspoon vanilla extract
- 8 oz cream cheese, room temperature
- ⅓ cup granulated sugar
- 1 large egg, room temperature
- ½ teaspoon vanilla extract
- 1 cup all-purpose flour (or gluten-free blend)
- ¾ cup Dutch-process cocoa powder, sifted
- ¼ teaspoon salt
- ¾ + 2 tablespoons refined coconut oil or neutral oil
- 1 ½ cups granulated sugar
- 1 tablespoon vanilla extract
- 3 large eggs, room temperature
Instructions
- Step 1: In a small saucepan, simmer raspberries, 1 tablespoon sugar, and 1 teaspoon vanilla extract over medium heat for 5–8 minutes until thickened. Strain the mixture through a fine mesh to remove seeds, then set the raspberry sauce aside.
- Step 2: Beat the cream cheese with ⅓ cup sugar until smooth. Add 1 egg and ½ teaspoon vanilla extract, mixing until creamy and well combined.
- Step 3: In a separate bowl, whisk together the flour, cocoa powder, and salt.
- Step 4: In another large bowl, combine ¾ cup plus 2 tablespoons oil, 1 ½ cups sugar, and 1 tablespoon vanilla extract. Add the 3 eggs one at a time, beating after each addition.
- Step 5: Gently fold the dry ingredients into the wet mixture until just blended; do not overmix.
- Step 6: Line a baking pan with parchment paper and spread the brownie batter evenly inside.
- Step 7: Spoon the cheesecake mixture over the brownie batter and spread lightly. Drizzle the raspberry sauce on top, then use a skewer or toothpick to swirl the layers artistically.
- Step 8: Bake in a preheated 350°F oven for 30–35 minutes until the top is set and a toothpick inserted near the center comes out with moist crumbs.
- Step 9: Allow the brownies to cool completely in the pan, then chill in the refrigerator for at least 2 hours before cutting.
- Step 10: Use a heart-shaped cookie cutter to cut the brownies into shapes and serve.
Tips & Variations
- Use room-temperature cream cheese and eggs to achieve the smoothest cheesecake layer.
- Strain the raspberry sauce well to ensure a silky texture without seeds.
- For a nutty twist, sprinkle chopped toasted pecans or walnuts over the batter before swirling in the raspberry sauce.
- Substitute fresh raspberries with frozen if fresh are out of season; just thaw before cooking.
Storage
Store the brownies covered in the refrigerator for up to 4 days to keep the cheesecake layer fresh. Reheat gently at room temperature if desired, but they are delicious served cold. For longer storage, freeze the brownies in an airtight container for up to 2 months and thaw overnight in the fridge before serving.
How to Serve

Serve this delicious recipe with your favorite sides.
FAQs
Can I use a different fruit for the swirl?
Yes! Blueberries, strawberries, or blackberries make excellent alternatives. Just cook and strain them as with the raspberries to create a smooth sauce.
How do I prevent the cheesecake layer from cracking?
Using room-temperature cream cheese and eggs helps prevent cracking. Also, avoid overbaking by checking just before the minimum baking time and removing when the center is still slightly jiggly.
PrintHeart-Shaped Raspberry Cheesecake Brownies Recipe
Delight in these charming Heart Shaped Brownies featuring a rich chocolate base marbled with creamy cheesecake and a vibrant raspberry swirl. This recipe combines a fudgy brownie batter with a smooth cream cheese layer and a tangy raspberry sauce, baked to perfection and chilled before cutting into adorable heart shapes, perfect for special occasions like Valentine’s Day or any sweet celebration.
- Prep Time: 20 minutes
- Cook Time: 35 minutes
- Total Time: 2 hours 55 minutes
- Yield: 12 servings 1x
- Category: Dessert
- Method: Baking
- Cuisine: American
Ingredients
Raspberry Sauce
- 1 cup raspberries (fresh or thawed frozen)
- 1 tablespoon granulated sugar
- 1 teaspoon vanilla extract
Cheesecake Layer
- 8 oz cream cheese, room temperature
- ⅓ cup granulated sugar
- 1 large egg, room temperature
- ½ teaspoon vanilla extract
Brownie Batter
- 1 cup all-purpose flour (or gluten-free blend)
- ¾ cup Dutch-process cocoa powder, sifted
- ¼ teaspoon salt
- ¾ cup + 2 tablespoons refined coconut oil or neutral oil
- 1 ½ cups granulated sugar
- 1 tablespoon vanilla extract
- 3 large eggs, room temperature
Instructions
- Prepare Raspberry Sauce: Combine raspberries, 1 tablespoon of sugar, and 1 teaspoon of vanilla extract in a saucepan. Simmer over medium heat for 5 to 8 minutes until thickened. Strain the mixture through a sieve to remove seeds, then set aside to cool.
- Make Cheesecake Mixture: Beat cream cheese and ⅓ cup sugar in a bowl until smooth and creamy. Add 1 large egg and ½ teaspoon vanilla extract, mixing until fully incorporated and silky.
- Mix Dry Ingredients: In a separate bowl, whisk together flour, sifted cocoa powder, and salt to ensure even distribution.
- Combine Wet Ingredients: In another bowl, mix ¾ cup plus 2 tablespoons of oil, 1 ½ cups sugar, and 1 tablespoon vanilla extract. Add the 3 large eggs one at a time, beating well after each addition.
- Combine Batter: Gradually add the dry ingredients to the wet mixture, stirring gently until just blended to prevent overmixing and maintain brownie texture.
- Assemble the Brownies: Spread the brownie batter evenly into a lined baking pan. Carefully pour the cheesecake mixture on top. Spoon dollops of the raspberry sauce over the cheesecake layer, then use a skewer or toothpick to gently swirl the raspberry into the cheesecake for a marbled effect.
- Bake: Place the pan in a preheated oven at 350°F (175°C) and bake for 30 to 35 minutes, or until the edges are set but the center still has a slight jiggle.
- Cool and Chill: Allow the brownies to cool completely at room temperature, then refrigerate for at least 2 hours to firm up, which makes cutting into heart shapes easier.
- Cut and Serve: Use a heart-shaped cookie cutter to cut the chilled brownies into shapes. Serve chilled or at room temperature for best flavor.
Notes
- Use room-temperature cream cheese and eggs to ensure a smooth, creamy cheesecake layer without lumps.
- Strain the raspberry sauce thoroughly to remove seeds for a smooth swirl and pleasant texture in every bite.
- Chill the brownies completely before cutting to prevent crumbling and maintain the heart shape.
- You can substitute all-purpose flour with a gluten-free blend for a gluten-free version.
- For a richer flavor, use Dutch-process cocoa powder as specified.
Keywords: cheesecake brownies, heart shaped brownies, raspberry swirl brownies, Valentine’s Day brownies